
If you're anything like me, you hate to pay big time prices for things that you can make (or semi-make) for a lot less. Well, today something very much like this happened to me.
 My gal pals and I were strolling through the local Dillard's when we passed the little girl's clothing section. Of course, we had to stop and oooh and awww at all the adorable clothes and sigh over the fact that our kids were too old to wear some of the precious little outfits. Just then, we saw these really cute "tween" Bermuda shorts that were strewn with paint.
 Turning to my friends I said, "These are really cute and I think I can make these." So, here is my first try at making something like these. I should state here, that I used old, cut-offs since I didn't want to mess up a brand new pair of pants if I screwed up. If they turned out okay, I figured I had salvaged something I would normally only let my kid wear around the house.
So, I purchased some glitter fabric paint. (Yes, you read right, GLITTER fabric paint.....I have three girls so I'm sure the glitz will be useable on many other future products!) Here's the run down on what you'll need to attempt this project:
Supplies
~Old newspaper or something to cover your workspace
~Fabric paints (glitter, neon, or whatever you prefer)
~Cardboard or an old magazine (to put between the layers of fabric)
~Plastic fork
~Scrap of paper (or something to put the paint into)
~Paper towel
 ~Jeans (old or new--your choice)
1. Cover your workspace and lay your jeans out. Try to line up the side seams so that the pants are laying flat and you are able to see the total front of the pants.
2. Put a bit of your paint colors onto a piece of scrap paper.

3. Put a a piece of cardboard or an old magazine inside of the jeans to preven the paint from bleeding through. (I used the cardboard backing from the fabric paint package.)

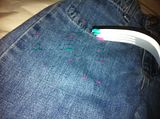
4. Now, dip your plastic fork into the paint. Put it on rather thick. ( I dipped it into two different colors at the same time--half the fork in one color and the other half in another.)

5. Now run the tines across the pants from the side seam inward and upward. Continue to recoat the fork and "splatter" paint randomly onto the fabric. (I loaded the tines with one color and then sort of shook the fork over where I wanted the paint to go.)

6. Before dipping your fork into new colors, wipe if off with a paper towel.

7. When you are happy with your "design," follow the directions on your fabric paint as to how to proceed. (My paint's directions stated that the item should remain flat for four hours and then could be washed, inside out, after 72 hours. No mention was made about heat setting, but I may do so anyway-- just to be on the safe side.) When the pants have sufficiently dried, I will flip them over and repeat the whole process again on the back.

After I've finished the back, and they've had time to dry, I will post the finished product. Hopefully, L'il Bit will think they are okay to wear. So far, they don't look too bad.
Hope you enjoyed this tutorial! If you link, please put a link back and give credit where credit is due.
Thanks,

No comments:
Post a Comment